一、概述
1、什么是GPT
GPT,全称“Generative Pre-training Transformer”,即生成式预训练可迁移注意力模型,简称“文本生成器”。本质上是NLP自然语言处理领域采用Transformer的attention注意力机制解决非精确的模糊化语义问题,从而带来了NLP领域的里程碑式改变。
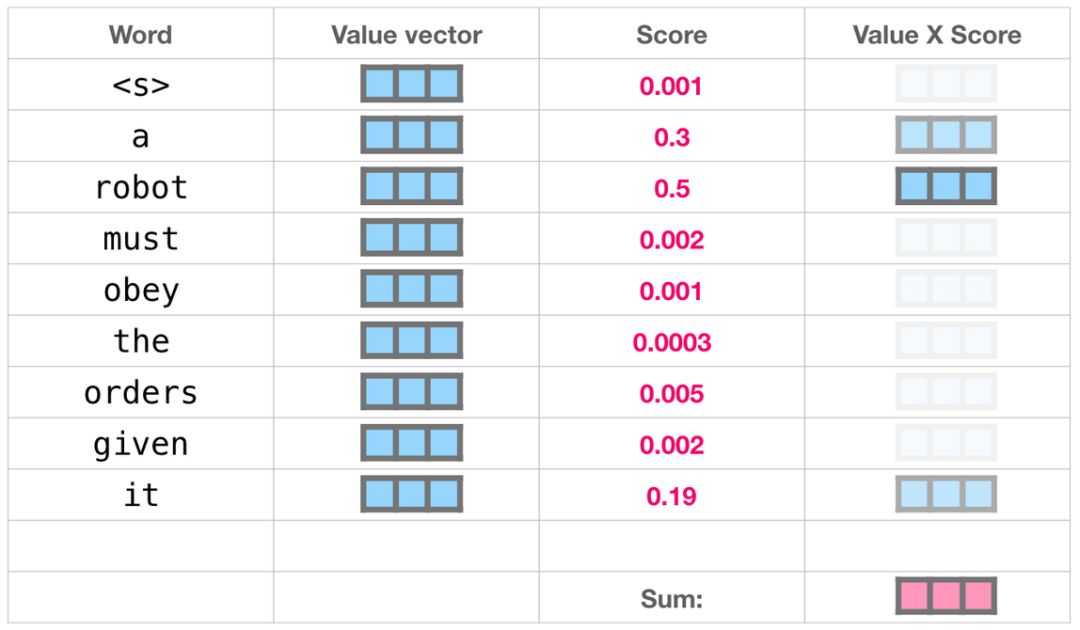
Transformer的attention机制的核心是通过编解码,将人类语言解析成及其可以理解的数字,模型通过注意力机制寻找向量之间的关系并生成模型参数,再根据参数,通过编码器生成我们符合预期的结果,参数量越大,结果越准确。参数最初是人为标注数据形成的,之后通过强化学习+奖励机制自动生成。从下图可以看到,它与棋类的强化学习后预测下步走法类似,只不过预测的是下一个应该出现的Word单词。
2、GPT的发展
GPT于2018年由埃隆·马斯克联合创办的人工智能研究实验室OpenAI发布,是一种自回归语言模型,这种模型利用深度学习产生类似于人类语言的文本。通俗的解释,GPT就是一种会不断学习并自行完成文字相关工作的电脑程序,且在学习过程中无需任何外界人员操作。
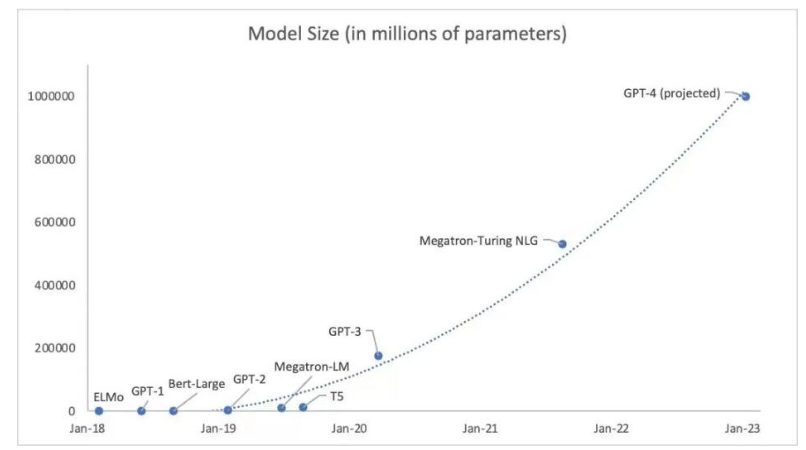
现如今,GPT已经发展到第3.5代,即GPT-3.5,大家目前用到的ChatGPT就是这个版本。与2018年第一版GPT 1.17亿的参数相比,GPT-3.5拥有着1750亿的参数量。这之间巨大的参数差距,极大程度提升了GPT的运行规模,让GPT开始能完成一系列令人难以置信的任务。
现阶段的GPT已经能做到:
- 1.作为基于问题的搜索引擎(类似百度);
- 2.能作为历史人物与其交谈的聊天机器人;
- 3.回答医疗问题;
- 4.谱写吉他曲谱;
- 5.英文翻译;
- 6.自动创作如小说;
等等一系列复杂工作。
GPT-4预计将在23年初发布,相较于GPT-3.5,GPT-4的性能将有着跳跃式的提升,参数量将大于1万亿,已通过图灵测试,更有传言表示GPT-4先进到几乎与人类没有区别的水平。
当然,从零开始训练一个GPT模型的成本是巨大的,GPT3模型实际是在3w张A100卡上训练的。如果成本底点,在1000张A100卡上训练一次需要2个月,购买GPU和配套+机房托管+电费成本至少也要1-2亿。
可是作为穷人,难道就不能学习了吗?当然是可以的,本文就带你一起来学习如何在普通GPU上训练GPT模型。
二、语料准备
要想训练出一个好的模型,需要喂入优质的语料,以下是从网上收集到的部分语料数据集。
1、THUCNews
清华大学自然语言处理与社会人文计算实验室THUCNews中文文本数据集
https://thunlp.oss-cn-qingdao.aliyuncs.com/THUCNews.zip
2、维基百科
https://pan.baidu.com/s/1uPMlIY3vhusdnhAge318TA
json版(wiki2019zh),104万个词条(1,043,224条; 原始文件大小1.6G,压缩文件519M;数据更新时间:2019.2.7),可以做为通用中文语料,做预训练的语料或构建词向量,也可以用于构建知识问答。
3、新闻语料
https://drive.google.com/file/d/1TMKu1FpTr6kcjWXWlQHX7YJsMfhhcVKp/view?usp=sharing
json版(news2016zh),包含了250万篇新闻。新闻来源涵盖了6.3万个媒体,含标题、关键词、描述、正文( 原始数据9G,压缩文件3.6G;新闻内容跨度:2014-2016年)。训练集:243万;验证集:7.7万。
可以做为【通用中文语料】,训练【词向量】或做为【预训练】的语料; 也可以用于训练【标题生成】模型,或训练【关键词生成】模型(选关键词内容不同于标题的数据); 亦可以通过新闻渠道区分出新闻的类型。
4、百科类问答
https://pan.baidu.com/s/12TCEwC_Q3He65HtPKN17cA # fu45
json版(baike2018qa),含有150万个预先过滤过的、高质量问题和答案,每个问题属于一个类别。总共有492个类别,其中频率达到或超过10次的类别有434个。训练集:142.5万;验证集:4.5万。
可以做为通用中文语料,训练词向量或做为预训练的语料;也可以用于构建百科类问答;其中类别信息比较有用,可以用于做监督训练,从而构建 更好句子表示的模型、句子相似性任务等。
5、社区问答
https://drive.google.com/open?id=1u2yW_XohbYL2YAK6Bzc5XrngHstQTf0v
json版(webtext2019zh) 大规模高质量数据集,含有410万个预先过滤过的、高质量问题和回复。每个问题属于一个【话题】,总共有2.8万个各式话题,话题包罗万象。从1400万个原始问答中,筛选出至少获得3个点赞以上的的答案,代表了回复的内容比较不错或有趣,从而获得高质量的数据集。除了对每个问题对应一个话题、问题的描述、一个或多个回复外,每个回复还带有点赞数、回复ID、回复者的标签。训练集:412万;验证集:6.8万;测试集:6.8万。可用于:
- 1)构建百科类问答:输入一个问题,构建检索系统得到一个回复或生产一个回复;或根据相关关键词从,社区问答库中筛选出你相关的领域数据
- 2)训练话题预测模型:输入一个问题(和或描述),预测属于话题。
- 3)训练社区问答(cQA)系统:针对一问多答的场景,输入一个问题,找到最相关的问题,在这个基础上基于不同答案回复的质量、 问题与答案的相关性,找到最好的答案。
- 4)做为通用中文语料,做大模型预训练的语料或训练词向量。其中类别信息也比较有用,可以用于做监督训练,从而构建更好句子表示的模型、句子相似性任务等。
- 5)结合点赞数量这一额外信息,预测回复的受欢迎程度或训练答案评分系统。
6、翻译语料
https://drive.google.com/open?id=1EX8eE5YWBxCaohBO8Fh4e2j3b9C2bTVQ
translation2019zh中英文平行语料520万对。每一个对,包含一个英文和对应的中文。中文或英文,多数情况是一句带标点符号的完整的话。对于一个平行的中英文对,中文平均有36个字,英文平均有19个单词(单词如“she”)。训练集:516万;验证集:3.9万。
可以用于训练中英文翻译系统,从中文翻译到英文,或从英文翻译到中文; 由于有上百万的中文句子,可以只抽取中文的句子,做为通用中文语料,训练词向量或做为预训练的语料。英文任务也可以类似操作。
三、模型训练
1、安装依赖:
# gpu driver
sudo ubuntu-drivers autoinstall
nvidia-smi
# 依赖
pip config set global.index-url https://pypi.tuna.tsinghua.edu.cn/simple
pip install numpy
pip install transformers
pip install datasets
pip install tiktoken
pip install wandb
pip install tqdm
# pytorch 1.13 需要关闭train.py中的开关 compile=False
pip install torch
# pytorch 2.0 模型加速要用到torch.compile(),只支持比较新的GPU
# pip install --pre torch[dynamo]  --force-reinstall --extra-index-url https://download.pytorch.org/whl/nightly/cu117 --timeout 60000
2、GPT网络模型定义
GPT 语言模型的定义参考:
1)OpenAI官方发布的GPT-2 TensorFlow实现:
https://github.com/openai/gpt-2/blob/master/src/model.py
2) huggingface/transformers PyTorch 实现:
https://github.com/huggingface/transformers/blob/main/src/transformers/models/gpt2/modeling_gpt2.py
"""
GPT 语言模型的定义参考:
1)OpenAI官方发布的GPT-2 TensorFlow 实现:
https://github.com/openai/gpt-2/blob/master/src/model.py
2) huggingface/transformers PyTorch 实现:
https://github.com/huggingface/transformers/blob/main/src/transformers/models/gpt2/modeling_gpt2.py
"""

import math
import inspect
from dataclasses import dataclass

import torch
import torch.nn as nn
from torch.nn import functional as F

# @torch.jit.script # 仅在不使用torch.compile时启用
def new_gelu(x):
    """
    Google BERT中实现的GELU激活函数(与 OpenAI GPT 相同)。参考:高斯误差线性单位(GELU)论文:https://arxiv.org/abs/1606.08415
    """
    return 0.5 * x * (1.0 + torch.tanh(math.sqrt(2.0 / math.pi) * (x + 0.044715 * torch.pow(x, 3.0))))

class LayerNorm(nn.Module):
    """  有一个可选偏差的LayerNorm。 PyTorch 不支持简单的 bias=False """

    def __init__(self, ndim, bias):
        super().__init__()
        self.weight = nn.Parameter(torch.ones(ndim))
        self.bias = nn.Parameter(torch.zeros(ndim)) if bias else None

    def forward(self, input):
        return F.layer_norm(input, self.weight.shape, self.weight, self.bias, 1e-5)

class CausalSelfAttention(nn.Module):

    def __init__(self, config):
        super().__init__()
        assert config.n_embd % config.n_head == 0
        # key, query, value projections for all heads, but in a batch
        self.c_attn = nn.Linear(config.n_embd, 3 * config.n_embd, bias=config.bias)
        # output projection
        self.c_proj = nn.Linear(config.n_embd, config.n_embd, bias=config.bias)
        # regularization
        self.attn_dropout = nn.Dropout(config.dropout)
        self.resid_dropout = nn.Dropout(config.dropout)
        self.n_head = config.n_head
        self.n_embd = config.n_embd
        self.dropout = config.dropout
        # flash attention make GPU go brrrrr but support is only in PyTorch nightly and still a bit scary
        self.flash = hasattr(torch.nn.functional, 'scaled_dot_product_attention') and self.dropout == 0.0
        if not self.flash:
            print("WARNING: using slow attention. Flash Attention atm needs PyTorch nightly and dropout=0.0")
            # causal mask to ensure that attention is only applied to the left in the input sequence
            self.register_buffer("bias", torch.tril(torch.ones(config.block_size, config.block_size))
                                        .view(1, 1, config.block_size, config.block_size))

    def forward(self, x):
        B, T, C = x.size() # batch size, sequence length, embedding dimensionality (n_embd)

        # calculate query, key, values for all heads in batch and move head forward to be the batch dim
        q, k ,v  = self.c_attn(x).split(self.n_embd, dim=2)
        k = k.view(B, T, self.n_head, C // self.n_head).transpose(1, 2) # (B, nh, T, hs)
        q = q.view(B, T, self.n_head, C // self.n_head).transpose(1, 2) # (B, nh, T, hs)
        v = v.view(B, T, self.n_head, C // self.n_head).transpose(1, 2) # (B, nh, T, hs)

        # causal self-attention; Self-attend: (B, nh, T, hs) x (B, nh, hs, T) -> (B, nh, T, T)
        if self.flash:
            # efficient attention using Flash Attention CUDA kernels
            y = torch.nn.functional.scaled_dot_product_attention(q, k, v, attn_mask=None, dropout_p=self.dropout, is_causal=True)
        else:
            # manual implementation of attention
            att = (q @ k.transpose(-2, -1)) * (1.0 / math.sqrt(k.size(-1)))
            att = att.masked_fill(self.bias[:,:,:T,:T] == 0, float('-inf'))
            att = F.softmax(att, dim=-1)
            att = self.attn_dropout(att)
            y = att @ v # (B, nh, T, T) x (B, nh, T, hs) -> (B, nh, T, hs)
        y = y.transpose(1, 2).contiguous().view(B, T, C) # re-assemble all head outputs side by side

        # output projection
        y = self.resid_dropout(self.c_proj(y))
        return y

class MLP(nn.Module):

    def __init__(self, config):
        super().__init__()
        self.c_fc    = nn.Linear(config.n_embd, 4 * config.n_embd, bias=config.bias)
        self.c_proj  = nn.Linear(4 * config.n_embd, config.n_embd, bias=config.bias)
        self.dropout = nn.Dropout(config.dropout)

    def forward(self, x):
        x = self.c_fc(x)
        x = new_gelu(x)
        x = self.c_proj(x)
        x = self.dropout(x)
        return x

class Block(nn.Module):

    def __init__(self, config):
        super().__init__()
        self.ln_1 = LayerNorm(config.n_embd, bias=config.bias)
        self.attn = CausalSelfAttention(config)
        self.ln_2 = LayerNorm(config.n_embd, bias=config.bias)
        self.mlp = MLP(config)

    def forward(self, x):
        x = x + self.attn(self.ln_1(x))
        x = x + self.mlp(self.ln_2(x))
        return x

@dataclass
class GPTConfig:
    block_size: int = 1024
    vocab_size: int = 50304 # GPT-2 vocab_size of 50257, padded up to nearest multiple of 64 for efficiency
    n_layer: int = 12
    n_head: int = 12
    n_embd: int = 768
    dropout: float = 0.0
    bias: bool = True # True: bias in Linears and LayerNorms, like GPT-2. False: a bit better and faster

class GPT(nn.Module):

    def __init__(self, config):
        super().__init__()
        assert config.vocab_size is not None
        assert config.block_size is not None
        self.config = config

        self.transformer = nn.ModuleDict(dict(
            wte = nn.Embedding(config.vocab_size, config.n_embd),
            wpe = nn.Embedding(config.block_size, config.n_embd),
            drop = nn.Dropout(config.dropout),
            h = nn.ModuleList([Block(config) for _ in range(config.n_layer)]),
            ln_f = LayerNorm(config.n_embd, bias=config.bias),
        ))
        self.lm_head = nn.Linear(config.n_embd, config.vocab_size, bias=False)
        # with weight tying when using torch.compile() some warnings get generated:
        # "UserWarning: functional_call was passed multiple values for tied weights.
        # This behavior is deprecated and will be an error in future versions"
        # not 100% sure what this is, so far seems to be harmless. TODO investigate
        self.transformer.wte.weight = self.lm_head.weight # https://paperswithcode.com/method/weight-tying

        # init all weights
        self.apply(self._init_weights)
        # apply special scaled init to the residual projections, per GPT-2 paper
        for pn, p in self.named_parameters():
            if pn.endswith('c_proj.weight'):
                torch.nn.init.normal_(p, mean=0.0, std=0.02/math.sqrt(2 * config.n_layer))

        # report number of parameters
        print("number of parameters: %.2fM" % (self.get_num_params()/1e6,))

    def get_num_params(self, non_embedding=True):
        """
        Return the number of parameters in the model.
        For non-embedding count (default), the position embeddings get subtracted.
        The token embeddings would too, except due to the parameter sharing these
        params are actually used as weights in the final layer, so we include them.
        """
        n_params = sum(p.numel() for p in self.parameters())
        if non_embedding:
            n_params -= self.transformer.wpe.weight.numel()
        return n_params

    def _init_weights(self, module):
        if isinstance(module, nn.Linear):
            torch.nn.init.normal_(module.weight, mean=0.0, std=0.02)
            if module.bias is not None:
                torch.nn.init.zeros_(module.bias)
        elif isinstance(module, nn.Embedding):
            torch.nn.init.normal_(module.weight, mean=0.0, std=0.02)

    def forward(self, idx, targets=None):
        device = idx.device
        b, t = idx.size()
        assert t <= self.config.block_size, f"Cannot forward sequence of length {t}, block size is only {self.config.block_size}"
        pos = torch.arange(0, t, dtype=torch.long, device=device).unsqueeze(0) # shape (1, t)

        # forward the GPT model itself
        tok_emb = self.transformer.wte(idx) # token embeddings of shape (b, t, n_embd)
        pos_emb = self.transformer.wpe(pos) # position embeddings of shape (1, t, n_embd)
        x = self.transformer.drop(tok_emb + pos_emb)
        for block in self.transformer.h:
            x = block(x)
        x = self.transformer.ln_f(x)

        if targets is not None:
            # if we are given some desired targets also calculate the loss
            logits = self.lm_head(x)
            loss = F.cross_entropy(logits.view(-1, logits.size(-1)), targets.view(-1), ignore_index=-1)
        else:
            # inference-time mini-optimization: only forward the lm_head on the very last position
            logits = self.lm_head(x[:, [-1], :]) # note: using list [-1] to preserve the time dim
            loss = None

        return logits, loss

    def crop_block_size(self, block_size):
        # model surgery to decrease the block size if necessary
        # e.g. we may load the GPT2 pretrained model checkpoint (block size 1024)
        # but want to use a smaller block size for some smaller, simpler model
        assert block_size <= self.config.block_size
        self.config.block_size = block_size
        self.transformer.wpe.weight = nn.Parameter(self.transformer.wpe.weight[:block_size])
        for block in self.transformer.h:
            block.attn.bias = block.attn.bias[:,:,:block_size,:block_size]

    @classmethod
    def from_pretrained(cls, model_type, override_args=None):
        assert model_type in {'gpt2', 'gpt2-medium', 'gpt2-large', 'gpt2-xl'}
        override_args = override_args or {} # default to empty dict
        # only dropout can be overridden see more notes below
        assert all(k == 'dropout' for k in override_args)
        from transformers import GPT2LMHeadModel
        print("loading weights from pretrained gpt: %s" % model_type)

        # n_layer, n_head and n_embd are determined from model_type
        config_args = {
            'gpt2':         dict(n_layer=12, n_head=12, n_embd=768),  # 124M params
            'gpt2-medium':  dict(n_layer=24, n_head=16, n_embd=1024), # 350M params
            'gpt2-large':   dict(n_layer=36, n_head=20, n_embd=1280), # 774M params
            'gpt2-xl':      dict(n_layer=48, n_head=25, n_embd=1600), # 1558M params
        }[model_type]
        print("forcing vocab_size=50257, block_size=1024, bias=True")
        config_args['vocab_size'] = 50257 # always 50257 for GPT model checkpoints
        config_args['block_size'] = 1024 # always 1024 for GPT model checkpoints
        config_args['bias'] = True # always True for GPT model checkpoints
        # we can override the dropout rate, if desired
        if 'dropout' in override_args:
            print(f"overriding dropout rate to {override_args['dropout']}")
            config_args['dropout'] = override_args['dropout']
        # create a from-scratch initialized minGPT model
        config = GPTConfig(**config_args)
        model = GPT(config)
        sd = model.state_dict()
        sd_keys = sd.keys()
        sd_keys = [k for k in sd_keys if not k.endswith('.attn.bias')] # discard this mask / buffer, not a param

        # init a huggingface/transformers model
        model_hf = GPT2LMHeadModel.from_pretrained(model_type)
        sd_hf = model_hf.state_dict()

        # copy while ensuring all of the parameters are aligned and match in names and shapes
        sd_keys_hf = sd_hf.keys()
        sd_keys_hf = [k for k in sd_keys_hf if not k.endswith('.attn.masked_bias')] # ignore these, just a buffer
        sd_keys_hf = [k for k in sd_keys_hf if not k.endswith('.attn.bias')] # same, just the mask (buffer)
        transposed = ['attn.c_attn.weight', 'attn.c_proj.weight', 'mlp.c_fc.weight', 'mlp.c_proj.weight']
        # basically the openai checkpoints use a "Conv1D" module, but we only want to use a vanilla Linear
        # this means that we have to transpose these weights when we import them
        assert len(sd_keys_hf) == len(sd_keys), f"mismatched keys: {len(sd_keys_hf)} != {len(sd_keys)}"
        for k in sd_keys_hf:
            if any(k.endswith(w) for w in transposed):
                # special treatment for the Conv1D weights we need to transpose
                assert sd_hf[k].shape[::-1] == sd[k].shape
                with torch.no_grad():
                    sd[k].copy_(sd_hf[k].t())
            else:
                # vanilla copy over the other parameters
                assert sd_hf[k].shape == sd[k].shape
                with torch.no_grad():
                    sd[k].copy_(sd_hf[k])

        return model

    def configure_optimizers(self, weight_decay, learning_rate, betas, device_type):
        """
        This long function is unfortunately doing something very simple and is being very defensive:
        We are separating out all parameters of the model into two buckets: those that will experience
        weight decay for regularization and those that won't (biases, and layernorm/embedding weights).
        We are then returning the PyTorch optimizer object.
        """

        # separate out all parameters to those that will and won't experience regularizing weight decay
        decay = set()
        no_decay = set()
        whitelist_weight_modules = (torch.nn.Linear, )
        blacklist_weight_modules = (torch.nn.LayerNorm, LayerNorm, torch.nn.Embedding)
        for mn, m in self.named_modules():
            for pn, p in m.named_parameters():
                fpn = '%s.%s' % (mn, pn) if mn else pn # full param name
                # random note: because named_modules and named_parameters are recursive
                # we will see the same tensors p many many times. but doing it this way
                # allows us to know which parent module any tensor p belongs to...
                if pn.endswith('bias'):
                    # all biases will not be decayed
                    no_decay.add(fpn)
                elif pn.endswith('weight') and isinstance(m, whitelist_weight_modules):
                    # weights of whitelist modules will be weight decayed
                    decay.add(fpn)
                elif pn.endswith('weight') and isinstance(m, blacklist_weight_modules):
                    # weights of blacklist modules will NOT be weight decayed
                    no_decay.add(fpn)

        # subtle: 'transformer.wte.weight' and 'lm_head.weight' are tied, so they
        # will appear in the no_decay and decay sets respectively after the above.
        # In addition, because named_parameters() doesn't return duplicates, it
        # will only return the first occurence, key'd by 'transformer.wte.weight', below.
        # so let's manually remove 'lm_head.weight' from decay set. This will include
        # this tensor into optimization via transformer.wte.weight only, and not decayed.
        decay.remove('lm_head.weight')

        # validate that we considered every parameter
        param_dict = {pn: p for pn, p in self.named_parameters()}
        inter_params = decay & no_decay
        union_params = decay | no_decay
        assert len(inter_params) == 0, "parameters %s made it into both decay/no_decay sets!" % (str(inter_params), )
        assert len(param_dict.keys() - union_params) == 0, "parameters %s were not separated into either decay/no_decay set!" \
                                                    % (str(param_dict.keys() - union_params), )

        # create the pytorch optimizer object
        optim_groups = [
            {"params": [param_dict[pn] for pn in sorted(list(decay))], "weight_decay": weight_decay},
            {"params": [param_dict[pn] for pn in sorted(list(no_decay))], "weight_decay": 0.0},
        ]
        # new PyTorch nightly has a new 'fused' option for AdamW that is much faster
        use_fused = (device_type == 'cuda') and ('fused' in inspect.signature(torch.optim.AdamW).parameters)
        print(f"using fused AdamW: {use_fused}")
        extra_args = dict(fused=True) if use_fused else dict()
        optimizer = torch.optim.AdamW(optim_groups, lr=learning_rate, betas=betas, **extra_args)

        return optimizer

    def estimate_mfu(self, fwdbwd_per_iter, dt):
        """ estimate model flops utilization (MFU) in units of A100 bfloat16 peak FLOPS """
        # first estimate the number of flops we do per iteration.
        # see PaLM paper Appendix B as ref: https://arxiv.org/abs/2204.02311
        N = self.get_num_params()
        cfg = self.config
        L, H, Q, T = cfg.n_layer, cfg.n_head, cfg.n_embd//cfg.n_head, cfg.block_size
        flops_per_token = 6*N + 12*L*H*Q*T
        flops_per_fwdbwd = flops_per_token * T
        flops_per_iter = flops_per_fwdbwd * fwdbwd_per_iter
        # express our flops throughput as ratio of A100 bfloat16 peak flops
        flops_achieved = flops_per_iter * (1.0/dt) # per second
        flops_promised = 312e12 # A100 GPU bfloat16 peak flops is 312 TFLOPS
        mfu = flops_achieved / flops_promised
        return mfu

    @torch.no_grad()
    def generate(self, idx, max_new_tokens, temperature=1.0, top_k=None):
        """
        Take a conditioning sequence of indices idx (LongTensor of shape (b,t)) and complete
        the sequence max_new_tokens times, feeding the predictions back into the model each time.
        Most likely you'll want to make sure to be in model.eval() mode of operation for this.
        """
        for _ in range(max_new_tokens):
            # if the sequence context is growing too long we must crop it at block_size
            idx_cond = idx if idx.size(1) <= self.config.block_size else idx[:, -self.config.block_size:]
            # forward the model to get the logits for the index in the sequence
            logits, _ = self(idx_cond)
            # pluck the logits at the final step and scale by desired temperature
            logits = logits[:, -1, :] / temperature
            # optionally crop the logits to only the top k options
            if top_k is not None:
                v, _ = torch.topk(logits, min(top_k, logits.size(-1)))
                logits[logits < v[:, [-1]]] = -float('Inf')
            # apply softmax to convert logits to (normalized) probabilities
            probs = F.softmax(logits, dim=-1)
            # sample from the distribution
            idx_next = torch.multinomial(probs, num_samples=1)
            # append sampled index to the running sequence and continue
            idx = torch.cat((idx, idx_next), dim=1)

        return idx
3、简单的莎士比亚作品训练
如果你不是深度学习专业人士,只是想感受一下魔力,尝试一下,那么最快的入门方式就是在莎士比亚的作品上训练一个角色级别的 GPT。首先,我们将其下载为单个 (1MB) 文件,并将其从原始文本转换为一个大的整数流:
# 拉取莎士比亚作品,并将字符映射为整数数据集train.bin/val.bin以及编码解码器文件meta.pkl(非GPT-2编码器时才有)
python data/shakespeare_char/prepare.py接下来我们训练一个初级的GPT模型 :
# 训练shakespeare
python train.py config/train_shakespeare_char.py

# 实测GTX1060 GPU,训练30分钟后,loss可以降到1.42左右
number of parameters: 10.65M
using fused AdamW: False
step 0: train loss 4.2874, val loss 4.2823
iter 0: loss 4.2675, time 124253.06ms, mfu -100.00%
iter 10: loss 3.2455, time 867.98ms, mfu 0.43%
... 30min later
saving checkpoint to out-shakespeare-char
iter 750: loss 1.4245, time 120214.49ms, mfu 0.38%
iter 760: loss 1.4523, time 876.03ms, mfu 0.38%
iter 770: loss 1.4261, time 872.84ms, mfu 0.39%
... 40min later
iter 980: loss 1.3589, time 869.70ms, mfu 0.42%
iter 990: loss 1.3402, time 878.26ms, mfu 0.42%
iter 1000: loss 1.3405, time 120470.64ms, mfu 0.38%
iter 1240: loss 1.2993, time 871.91ms, mfu 0.42%
如果深入其中,你会看到我们正在训练一个上下文大小高达 256 个字符、384 个特征通道的 GPT,它是一个 6 层 Transformer,每层有 6 个头。如果是在A100 GPU 上,此训练运行大约需要 3 分钟,最佳loss为 1.4697,而在GTX1060上,要达到相同loss需要大约30分钟。我们也可以通过调整训练参数来加快训练速度:
# 更多的噪音但更快的估计eval_iters200->20,上下文大小256->64,每次迭代的批量样例大小64->12,更小的Transformer(4 层、4 个头、128 嵌入大小),并将迭代次数减少到 2000,简化正则化dropout=0.0
python train.py config/train_shakespeare_char.py -eval_iters=20 --log_interval=1 --block_size=64 --batch_size=12 --n_layer=4 --n_head=4 --n_embd=128 --max_iters=2000 --lr_decay_iters=2000 --dropout=0.0根据配置,模型检查点被写入--out_dir目录out-shakespeare-char。因此,一旦训练完成,我们就可以通过将采样脚本指向此目录来从最佳模型中采样:
# 文本生成
python sample.py --out_dir=out-shakespeare-char  --num_samples=2
这会生成一些示例,例如:
STANLEY:
Here did thy best encountreaty days and barneth;
Nurse, here's determine, away, my father,
And I'll not speak thy heart mildness.

CLARENCE:
One, my lord, in thy sovereign the house
That else no means that would by myself is the tyranny.

HERMIONE:
My voices:
Give me to kill you so do not in the maid,
Which I will not poor my husband's body breath! I am in his shade.

RIVERS:
If it bring my own rage, being, you are advance.

EDWARD:
Night to make no much stoopy to the
---------------

Menenio, knees you shall have hang hateful good?

TRANIO:
Well, and shall be here not uncled, whom come some stopp'd;
And my name of Marcius.

LUCIO:
Ah, sir! the most statue's courteen some still.

DUKE VIRGERY:
My brother gracious lord; I dare not good chance bear
the were but weak some in the sun of the wolf of this hearts
Of subjects in the choose of the goey severeign
Ships the shopen eyes and approach ower.

KING RICHARD II:
My lord, on sovereign; and make I took of thee,
To cold thee to e
---------------
哈哈,在 GPU 上训练 40分钟后,对于字符级模型来说效果还不错。通过在此数据集上微调预训练的 GPT-2 模型,很可能会获得更好的结果。
4、复现GPT-2
深度学习专业人士可能对重现 GPT-2 结果更感兴趣,我们在这里尝试下。
4.1 从零开始训练
首先需要标记数据集,这里我们直接使用部分开放的OpenWebText数据集(12.9G大小,是OpenAI使用的可公开子集):
# 将 openwebtext 数据集下载并处理为二进制文件用于训练(train.bin/val.bin,GPT2 BPE TokenID,uint16)
python data/openwebtext/prepare.py
然后我们准备开始训练。要重现 GPT-2 (124M),您至少需要一个 8X A100 40GB 节点并运行:
# 普通单GPU上训练
python train.py
# A100上训练(根据A100卡数量调整--nproc_per_node参数)
# torchrun --standalone --nproc_per_node=8 train.py config/train_gpt2.py
这个训练过程真是漫长啊,在GTX1060上,基本要训练一年loss才能下降到2.85左右;如果用8张A100 40G显存卡,预计需要4天左右。
我们这些穷人总不能要等上一年半载才能看到结果吧?不要怕,GPT是预训练模型,为了加快速度,我们可以直接加载GPT-2预训练模型,再继续喂入语料训练即可。
4.2 从GPT-2预训练模型开始训练
预训练模型loss情况:
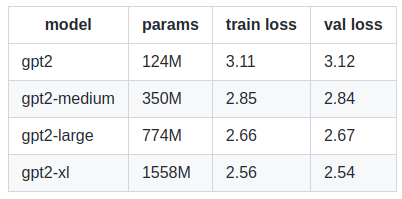
从GPT-2预训练模型进行初始化并以较小的学习率进行训练:
# 拉取莎士比亚作品,使用OpenAI BPE分词器生成train.bin/val.bin
python data/shakespeare/prepare.py
# 加载GPT-2预训练模型、莎士比亚数据进行训练
python train.py config/finetune_shakespeare.py
4.3 通过GPT-2预训练模型进行文本输出
# 加载GPT-2预训练模型,进行文本输出
python sample.py  --init_from=gpt2   --start="生命、宇宙和一切的答案是什么?"  --num_samples=3 --max_new_tokens=1000
4.4 通过本地模型进行文本输出
4.1/4.2步骤本地迭代训练生成的best checkpoint model(最低验证损失)将保存在out_dir目录中,如果要加载继续训练后的模型进行文本输出的话,可以通过--out_dir参数指定位置
# 加载本地模型,传入字符串进行文本输出
python sample.py  --out_dir=out-shakespeare --start="hi" --num_samples=3 --max_new_tokens=100
# 加载本地模型,传入文件进行文本输出
python sample.py  --out_dir=out-shakespeare --start="FILE:abc.txt" --num_samples=3 --max_new_tokens=1000
测试效果:
An'al-liqal,

Did you hear the coming of Allah's Apostle?

Imam of Abu Bakr,
O 'Abdullah!
O O `Abdullah!
Had man said: 'O Allah!
'O Allah!
O O 'Abdullah!
I am the Prophet of Allah!
O O Allah!

---------------
hi we all went out to fight and I know there's not a soul to know more. All in the morning some of them went out at first, but some of them went on to the warhouse and some went out again. So I was on board the ship, and at night came to see how the weather was done. There was a wind, and some of the ships were on, some were on in the air, some were off, some were on the ground.

---------------
hi was not so far from it. They called us to him.

Sixty of them had been left with him to the bed.

And, now, as the bed was far from the bed, he lay back, and looked at the morning stars.
5、中文数据集训练
5.1 检查gpt-encoder/decode编解码对中文的处理是否正确
data = 'AI 新人类:从诞生到成长 ——百度 AI 社会价值报告'
enc = tiktoken.get_encoding("gpt2")
# encode
train_ids = enc.encode_ordinary(train_data)
print('encode: ', train_ids)
# decode
res = enc.decode(train_ids)
print('decode: ', res)

-----------------
train_ids:  [20185, 10545, 244, 108, 21689, 163, 109, 119, 25, 20015, 236, 46237, 252, 37955, 26344, 108, 22755, 238, 165, 243, 123, 851, 960, 163, 247, 122, 41753, 99, 9552, 13328, 97, 122, 27670, 248, 20015, 115, 161, 222, 120, 162, 232, 98, 37772, 232]
decode:  AI 新人类:从诞生到成长 ——百度 AI 社会价值报告
5.2 准备中文数据集及编解码处理
在data目录下新建一个chinese目录,创建input.txt,放入中文素材。(可参考shakespeare)
创建prepare.py并执行,将中文素材处理为编码后的train.bin(素材前90%训练用)、val.bin(素材后10%验证用):
python data/chinese/prepare.py5.3 中文训练
创建config/train_chinese.py训练配置,设置好素材目录、模型输出目录、训练参数等,并启动训练:
python train.py config/train_chinese.py5.4 中文生成
# 加载本地模型,传入字符串进行文本输出
python sample.py --out_dir=out-chinese --start="AI社会价值" --num_samples=3 --max_new_tokens=100
源代码位置:https://github.com/yanjingang/nanoGPT
yan 2.24
参考:
大规模中文自然语言处理语料 Large Scale Chinese Corpus for NLP
医疗NLP领域(主要关注中文) 评测数据集 与 论文等相关资源。